
Hello,
I have been reading Yoshida Styles (the book I mentioned in my post: my first 1/12 scale bjd ) and I came across a technique for making eyes. The technique described in the book was suited for bigger dolls but the idea was brilliant. Basically you take cabochons and remove the backing with acetone. Then it will leave you with a blank eye. In Yoshida Styles, he would trace a circle around the glass cabochon on a white piece of paper then he would ink the colours of the pupil. then He would cut it out, glue the paper to the glass with clear nail polish then make a ball of white sculpey, stick the iris in it and bake it. I used this technique in one of my miniature cat : ginger felted calico cat-Bella and a 1/12 scale ball jointed doll
But I wanted glass eyes for my dolls... However I never found glass cabochons that were tiny enough to use this technique so I developped a technique that is very similar. It gives interesting results.
Here is what I did:
#1: Take 4mm glass cabochons and dip them in acetone if they have a foil backing.

 |
| Here is a tip. I put the acetone in a small glass component then I placed it in warm water. This helps the acetone work faster. |
#2: While you wait for the acetone to take effect, take a sheet of paper of the colour of the eye you want and punch holes to make the pupils.
 |
| I used a pearlescent paper because I wanted the eyes to look bright. |

The smaller your punch, the better the results. In my example, I find the pupils might be a little big for my taste since the glass enhances it. I think it would work better if they were just a mm smaller to leave more white around but the end results looked very nice nonetheless.

#3: Take a very fine marker and put a dot in the middle, holding it in place with your nail-Warning, those things bounce.


#5: After the cabochons were in the acetone for 15 minutes, rub the backing with a cotton swab untill it is clear then take a clear varnish and glue the pupils onto the center of your clear cabochon.


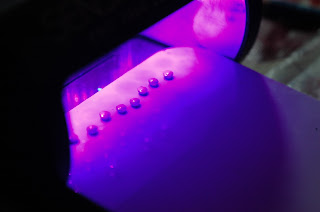
#6: Very carefully you put them under the UV led lamp and let cure for 1 minute. After that you take the cleaser and you whip the back of each to remove any sticky residue and you are done!


#3: Take a very fine marker and put a dot in the middle, holding it in place with your nail-Warning, those things bounce.


#4: Take a coloured pencil in a darker shade and run it along the edges of the pupil

Then add details in the eye with various shades
 |
| I used a dark blue, a medium blue and a grey for this example |
 |
| Here is a finished pair next to a blank one |
 |
| And here I made green, brown and aqua pupils as well. |
 |
| This is to show the scale. |
#5: After the cabochons were in the acetone for 15 minutes, rub the backing with a cotton swab untill it is clear then take a clear varnish and glue the pupils onto the center of your clear cabochon.

 |
| put a small amount of clear varnish on the back of the cabochon |
 |
| With the drawing facing down, make sure that the pupil is well centered . Once it is dry, put a small amount of clear varnish on top to seal the paper. |
 |
| This is what it should look like at this stage |

Wait for the varnish to dry before you proceed to the next step.
#6: Using Sensationail white nail polish (or any uv polish and led light) put a drop over the back of the cabochons and be careful not to put too much, you don't want it to tip over.


 |
| You want to make sure the white covers the whole back |

Here are the finished glass eyes!

Hope you enjoyed this tutorial as much as I enjoyed doing it. You can even use this technique for making intricate miniature paper weights too...
Now if I could only get my hands on a smaller punch...
I am back and I found a 1mm punch!!! Okay it is a border punch with flowers and dots which means I waste more paper but the dots were 1mm!!! Lets face it when you only need 1mm, there is still plenty of paper left I guess...

Here is the difference when compared to the 2mm ones I had before. It is harder to make details in the pupils but the overall look is much better and more accurate.
Thanks for looking:D
No comments:
Post a Comment