
Following a comment I received I tought I could update this post and start by showing a picture of the materials I used so here goes:
The material to do the body:

The material to do the base sketch and structure of the doll:

The materials to sculpt:

The material for stringing the doll:


The material for painting:

The finishing touches:

Now that the materials have been introduced, here is my ball jointed doll's step by step progress.


Step 2: Sculpting the arms, legs and body


Then I added Ladoll clay to the styrofoam and sculpt the body.
After many adjustments and by always going back to the sketch, I was finally ready for the ball joints. Next time, I will sculpt the arms and legs longer than what I want because when you cut the knees and elbows, you loose 1/8 approximatly. Won't make that mistake twice...
Step 3: The ball joints
This is another fun part. I took small styrofoam balls and roll clay on top, keeping the clay to an even thickness (This is super easy If you have a pasta machine). I chose balls that are smaller than what I needed so that it will fit once the clay is added on the ball. I drilled a bunch of holes in the balls once they dried (knees and elbows) to create a vertical slot on the top part of the balls. I cut it open with a sharp tool. I use sharp rasps for miniature work. Then I drilled a larger hole on the bottom of the ball (knees and elbows). I ended up with 4 balls with a hole on the botom and a vertical slot on top.
Good tools means less energy wasted. I found small tiny drills in a wholesale jewelery store... It works like a charm.

The balls for the shoulders should have a hole on the side going into the doll's body and a hole going down the arm. As for the wrists and ankles, they are easier to make because you don't need the stryrofoam. I Just rolled the amount of clay that I needed than made a vertical slot on top after connecting it to the feet and hands (I cut the slot once the ball and the part were well attached and dried). For the ankles and wrists, I created a tiny hole on each side of the slot and glued a metal wire in between. You can add clay on the sides of the ball after that to make it stronger. For the head, I drilled two holes on top, bent the wire to form a hook and then made it go trough the first hole from inside the head and out. I then bent the wire again so it can go trough the other hole, securing the hook to the head. Now I was ready to string!

For details on how to do the joints and full instructions and tips on making a bjd, I strongly recommend reading the book Yoshida Style. It is in japanese but offers a lot of images making it easy to understand.
Step 4: String the parts.
I used three elastics. One for the arms and one for each legs. The ones for the legs are held by an s-hook connected to the ankle and attached to the s-hook in the head. The arms are attached from one s-hook on the right hand going to the next s-hook on the left hand. Then I had to test to see if I had the right lenght... Many times...

The hardest part in the process was to make tiny beautifull feet so that the doll can wear the gorgeous shoes made by Judy Blondell. Victory!!!
If you simply adore those gorgeous white pumps that my doll is wearing, you will looooove browsing her website. Here is the link to this amazingly talented artist: http://jbminidreams.com/
Step 6: Making the eyes
I cut holes for her eyes and used the technique from my previous tuttorial that you can see by clicking this link: How to make 1/12 scale miniature eyes tutorial


Then I made her a cute dress. :D
Step 5: Adjustments (this takes forever)
Sand here, add clay there, test elastics... Notice how she slimed down? :)
I had to make double joints for the knees because the single joints made her to short. I am glad I did so because now she can have more natural poses.
I added viscose lashes to her face and painted the body with a mix of make-up and gesso. Works great and gives her a very natural skin tone.


Step 6: Varnish and final assembly
Here I used a metal hanger to hang the doll's parts so the varnish can be sprayed evenly. And I let it dry waiting anxiously. I could not wait to see this doll finished!


Step 7: Make the wig
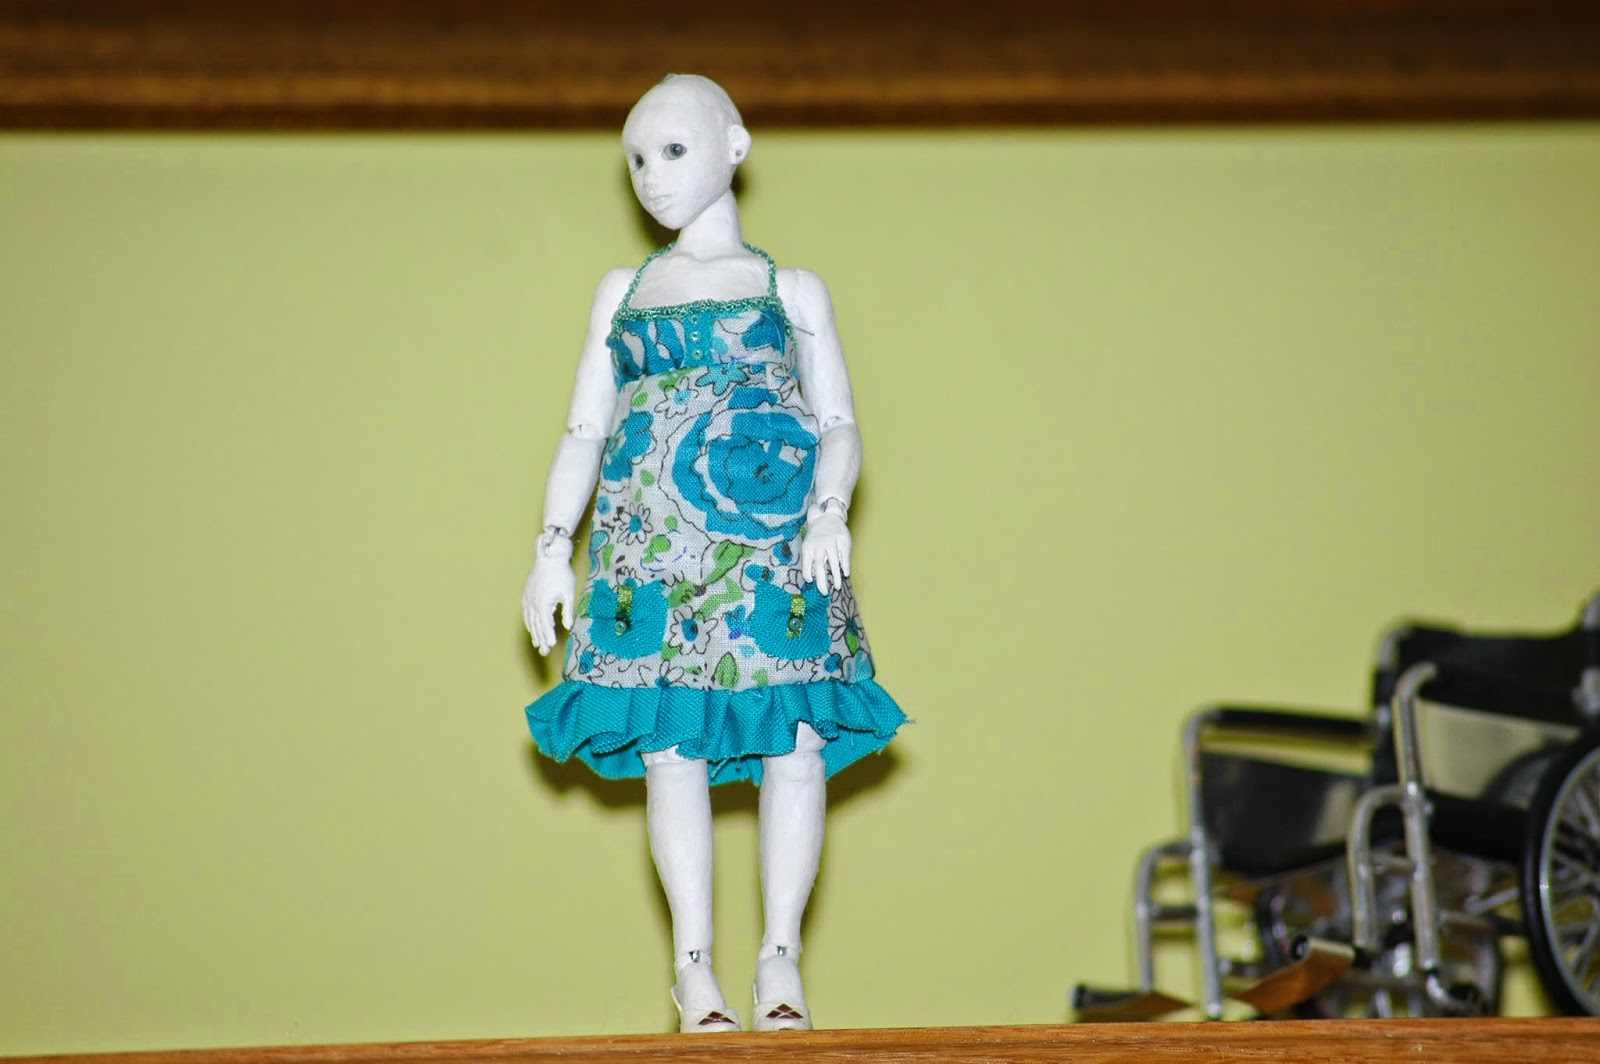
And it is finally done!!! Here she is, dressed and ready for a walk with her dogs.

If you want to see more pictures of her, click here: my first bjd!
Hope you enjoyed this post!
I love the fact that your foam base is already wearing her hat. Her personallity is already showing through ^____^
ReplyDeleteHi hi, too bad the hat did not fit in the end though.
DeleteHi -- This is "Pittsburgh Admirer" again (Laurel). The last time I visited your site, I was so busy examining your felted dogs and knitted outfits for them, I totally missed this doll! Wow. She's amazing. I can't get over how life-like her many poses are, how nicely her eyes and face are done, and in general, how fabulous she is. No wonder you want to make more! Thanks for the step-by-step explanations for making her, although I myself couldn't quite picture them all, because I'm unfamiliar with some of the supplies. I hope you'll keep us posted on your future work! (I returned to your site because I couldn't remember the kind of thread you use for knitting the tiny doggie jackets. Now back to that.... ) Thanks again for your generous sharing. L.
ReplyDeleteHi Laurel,
ReplyDeleteYour comment is really kind and fills me with joy! Thank you very much. I think it is indeed a great idea To list the materials and to take pictures of
It too. As soon as I have time I will get on that. There are also some
steps that are not illustrated, I might
make drawings to explain it better. Thank you for your very kind feedback.